
Steps to export a 3D data object from Slicer as an .mhd file, then use the file to create a color transform .xml that can be used in Unity:
Software authored by: Kumar Punithakumar
Scripts required: https://github.com/Know-Thyself-as-a-Virtual-Reality/MHD-ColorTransfrom
VIMEO link: https://vimeo.com/726185031 (Color transform instructions start at 00:02:43)
Step by step (exporting from Slicer):
- Start with a scene in Slicer, it should contain the object you want to work with.
- Select the volume rendering module from the dropdown menu (fig. 1).
- Select the model you want to export. Ensure it is the only model selected (the eye icon can be clicked to toggle model visibility).
- Select file in the top dropdown menu, then click save (fig. 2).
- When the save scene window opens, ensure only the model you want to export is selected (fig. 3). Change the file format to .mhd in its corresponding menu.
- Click the box for show options (fig. 4) at the top right of the window and deselect compress for the file (compressed files won’t import to Unity correctly).
- Select a location to export the file to and click save.
Step by step (creating color transform .xml – starts at 00:02:43 in video):
- Close or minimize Slicer and move into Color Transform.
- Click load meta image at the bottom of the screen (fig. 5). A window should open to allow you to locate and open the .mhd file you just created in Slicer.
- Under the lighting tab, shading can be turned off (fig. 6) so the model’s colors can be seen more easily.
- Select the opacity and color tab, then click transfer function editor to open a window where the model’s colors can be edited.
- Click the circular nodes to select, then click the color button to change the color (fig. 7). More nodes can be added by double clicking on the line.
- Click and drag the nodes to adjust value and opacity as desired. The window can be closed when the colors look as desired.
- Also in the opacity and color tab, the adjust transfer function window can be opened and used to edit the color curve.
- Navigate back to the lighting tab and test how the model looks with shading on.
- When you’re ready, click save settings (fig. 8), ensure .xml is the file format selected, then click save.
- You can now use the load settings menu to toggle between the available color transforms (fig. 9).
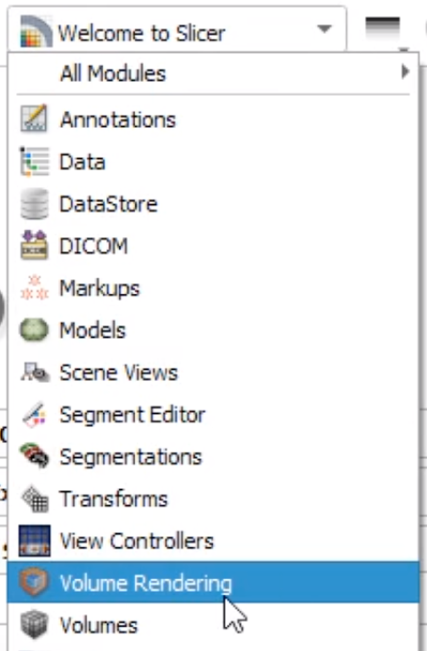
Fig. 1
Select the volume rendering module
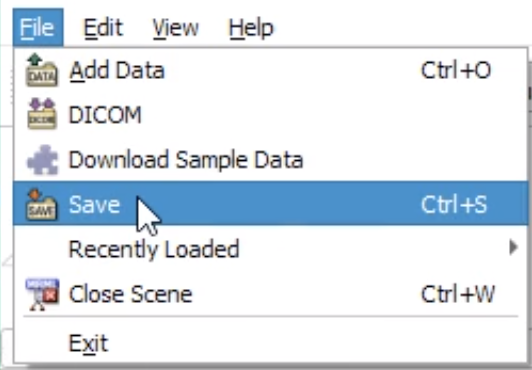
Fig. 2
File then save, or Ctrl+S (PC) to access save scene menu
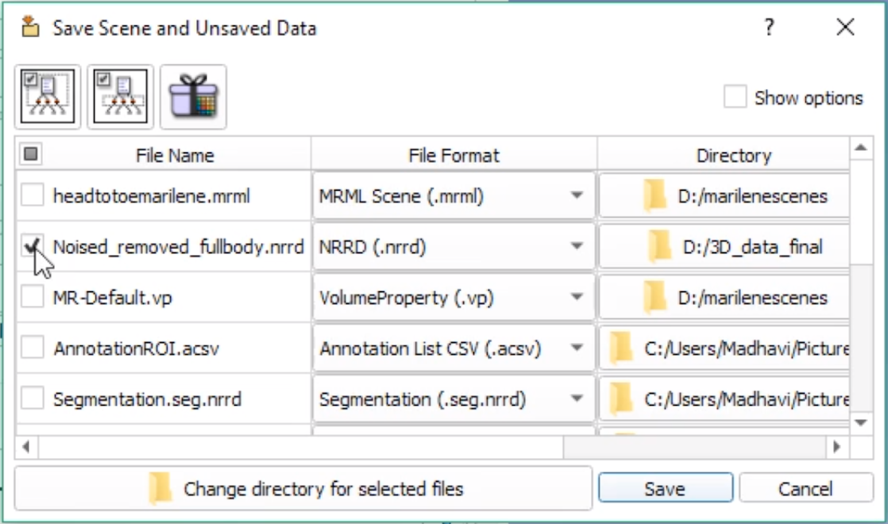
Fig. 3
Select only the model you want to export, check that no others are selected
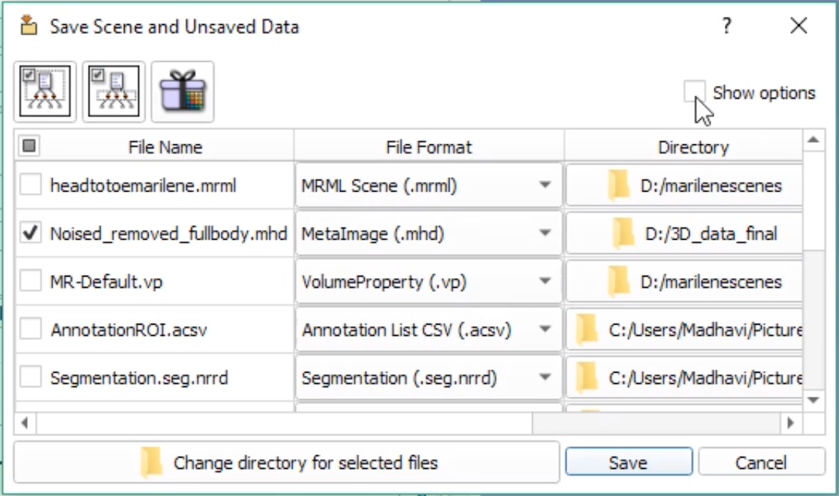
Fig. 4
Don’t forget to deselect compression. Select show options to do so

Fig. 5
The load meta image button is under the general controls tab

Fig. 6
Toggle shading on and off

Fig. 7
Changing the color of the selected node in the transfer function editor

Fig. 8
Save settings button to create the .xml

Fig. 9
Available color transforms should appear in the load settings dropdown menu
Note:
- Colors applied to the model prior to exporting will not show up in the .mhd file.