
Use to view and capture images of in-game scenes without the interference of other layers. Great for editing scenes which are obstructed by other layers.
Scripts required: Teleport Snap Photos
GitHub link: https://github.com/Know-Thyself-as-a-Virtual-Reality/KTVR-DICOM-Tools
VIMEO link: https://vimeo.com/730754141/dfded85eee
Step by step (initial setup):
- If you don’t already have the Oculus Integration package installed, download it from the Oculus website (full instructions for this step can be found here).
- Ensure you’ve downloaded the KTVR project file from GitHub. Instructions for starting the project and importing DICOM datasets can be found here.
Step by step (camera and scene setup):
- Right click inside the hierarchy on the left-hand side of Unity and select Camera from the menu. Can rename it if desired.
- With the camera selected in the hierarchy, click Add Component in the inspector. Search for and add the Teleport Snap Photos script.
- Create a number of empty game objects using the right click menu.
- Rename your object layers so they’re easier to differentiate.
- Place the GameObjects you want, from your project, separated from each other in their own respective empty GameObject layers.
- Select the camera in the hierarchy, then in the inspector under Teleport Snap Photos click Choose Directory (fig. 1) and a dialog box should open to let you decide where you want the hi res camera photos to save.
- Next, still under Teleport Snap Photos in the inspector, set the desired width and height dimensions for the hi res camera images (mind the aspect ratio).
- Still under Teleport Snap Photos, for the Size field, input a numerical value for the number of layers to capture. It will automatically add Element fields.
- Click and drag each layer from the hierarchy to the Element fields (fig. 2).
- With the camera selected in the hierarchy, ensure Target Eye is set to None (Main Display) under Camera, and the Audio Listener box is unchecked (fig. 3).
Step by step (camera and scene setup):
- Click the play button to use the camera.
- For the right-hand controller, the B button will center the camera to look wherever the player is looking (teleports to central eye anchor).
- The right A button can be used to freeze the frame and capture the image.
- Head over to the output directory location to access the images. The file names will be numbered in the order they were captured.
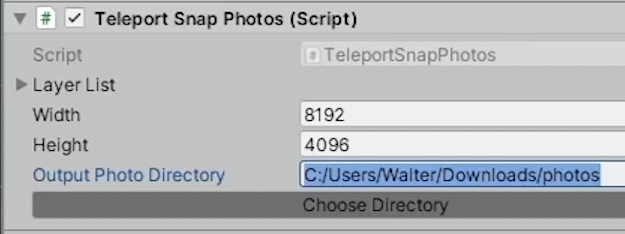
Fig. 1
Enter a file location for the image output or click Choose Directory to find one
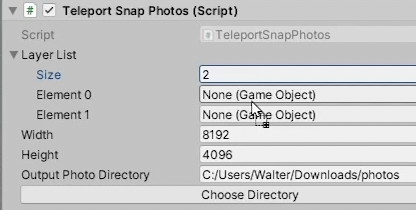
Fig. 2
Drag each layer from the hierarchy to the appropriate Element fields in the Teleport Snap Photos inspector
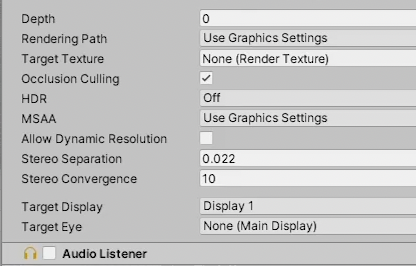
Fig. 3
Ensure Target Eye is set to None and Audio Listener is unchecked
Note:
- If you have particles in your environment and would like for them to appear in the hi res images, ensure the particles are held in the first layer; otherwise they’ll be deselected as the camera cycles through the layers and won’t appear.
- The player’s hands will remain visible in the hi res images if you don’t remove them from the area you plan to capture first.
- Be mindful of your computer’s processing specifications if you’re considering having the camera output large images. Adjustments can be made as needed if problems arise. The number of layers shouldn’t affect processing abilities though more layers can make image capturing slower.
- You may wish to change the background color for the hi res camera (under Camera in the inspector). The scene’s background can be matched by copying component values for the background color under Camera for the Center Eye Anchor inside the OVRPlayerController and pasting it to the background field for the hi res camera (you’ll need to switch Target Eye back to None after).
- Use the Field of View slider in the hi res camera inspector to alter the image capture area. Can be used to capture wide-angle images.