
How to use Unity to create a wand controller and attach scripts to allow it to play dynamic motion controlled audio in-game
Scripts required: OVR Grabbable Extended, Teleport Wand On Press, Send Location Control Sound, Sound Control By Voxel Util
GitHub link: https://github.com/Know-Thyself-as-a-Virtual-Reality/KTVR-DICOM-Tools
VIMEO link: https://vimeo.com/730611729/65ff0a1b3e
Step by step (initial setup):
- If you don’t already have the Oculus Integration package installed, download it from the Oculus website (full instructions for this step can be found here).
- Set up your scene by following the tutorials for importing datasets, setting up the SelectionManager controls and adding ClippingPlaneControls.
Step by step (make a wand):
- Create a wand by using the right-click menu to generate 3D objects (a sphere and two cylinders work well). Arrange the objects as desired, A wider cylinder at the bottom makes a good handle (see fig. 1 or video for inspiration).
- Once it looks how you’d like, select all the 3D objects used in the wand except the handle in the hierarchy; then drag them to the handle object to group them as children of the wand handle (parent object) (Fig. 1). Doing this will allow users to move the entire wand just by grabbing the handle.
Step by step (attach components and scripts):
- With the wand handle selected in the hierarchy, click Add Component. Search for and add a Rigidbody component and OVR Grabbable Extended script.
- Under Rigidbody in the inspector, ensure “Use Gravity” is unchecked and “is Kinematic” is checked.
- In the hierarchy, find the hand anchors by opening OVRPlayerController, OVRCameraRig, then they should be inside TrackingSpace (fig. 2).
- Click and drag each hand anchor to the corresponding fields under Teleport Wand On Press in the inspector to link them (fig. 3).
- With the wand head selected in the hierarchy, click Add Component in the inspector and add the Send Location Control Sound script.
- Locate the dataset in the hierarchy whose sound you’d like to be able to control and click and drag it to the Body Object field under Send Location Control Sound in the inspector (fig. 4).
- Ensure “Can Control Sound” box is checked for Send Location Control Sound.
- With the dataset still selected in the hierarchy, add a Sound Control By Voxel Util script in the inspector.
Step by step (how to use):
- Press the play button to activate and use either hand’s thumb buttons to teleport the wand directly to your hand.
- Hold the wand using the grab buttons and move the wand around inside the dataset to hear the changing audio.
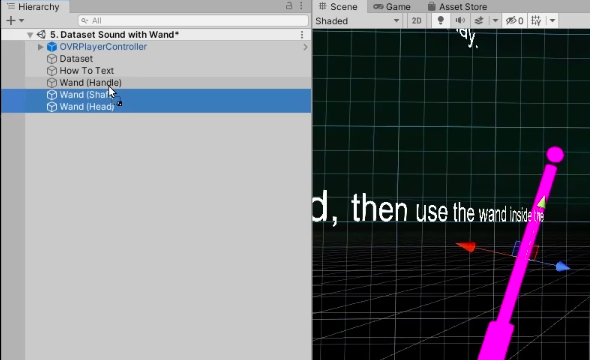
Fig. 1
Adding wand parts as children of the wand handle (see wand on right)
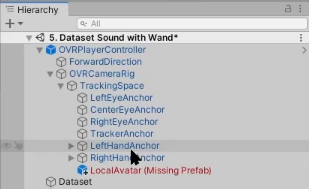
Fig. 2
Location of hand anchors inside the OVRPlayerController
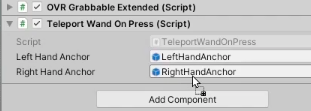
Fig. 3
Dragging corresponding hand anchors to the Teleport Wand On Press script
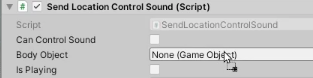
Fig. 4
Linking the dataset and the Send Location Control Sound script
Note:
- If objects appear in Unity as plain magenta (see wand in fig. 1 for example), it usually means there is an error with the shader (such as a missing material). You can leave them as-is or add your own material under Mesh Renderer (more info).